|
There are a number of tools available to provide assistance with building Compiled HTML Help (CHM) files. You should refer to the documentation provided with these tools for more information about how to use them. The following text describes how the HTML Help Workshop can be used to generate a CHM file suitable for displaying context sensitive help in USoft applications. HTML Help Workshop is available as a free download from the Microsoft Web site (search for HHW.EXE).
To make a help file containing context-sensitive help topics:
| 1. | Using your favorite editor, make a HTML document containing the desired context-sensitive help for each object concerned. Each object will have its own HTML file. You will now have a set of HTML files, for example: |
Object1.htm
Object2.htm
Object3.htm
Object4.htm
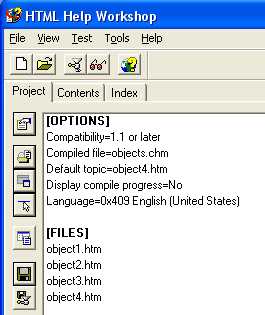
| 2. | Open HTML Help Workshop and from the File menu, choose New, followed by project to start the New Project Wizard. |
| 3. | Click Next to skip the step about converting WinHelp projects. Specify the name of the new project file, for example objects.hhp, and where you would like the file to be created, and click Next. |
| 4. | Check the HTML files checkbox, and click Next to include the HTML files that you made earlier in the project. Click Add to open a browse window so that you can find the HTML files. Click Next and Finish. The new project will now be created and opened in the Workshop |

| 5. | To make these help topics accessible from the USoft application, you must now provide mapping and alias information in the project. Using a text editor, create a map file and an alias file to be included in the compilation of the CHM file. |
| The map file, which we will call objectsmap.h, contains the following lines: |
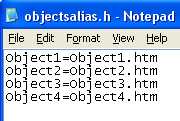
| The alias file, which we will call objectsalias.h, contains the following lines: |

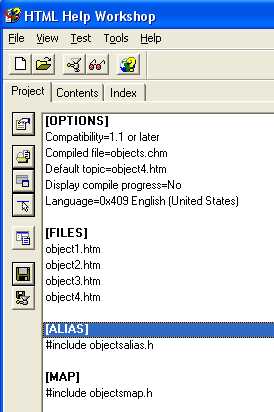
| 6. | In the HTML Help workshop, the map and alias files must now be included in the objects.hhp project file. |
| Click the  button on the project tab to open the HTMLHelp API information window. On the Map tab, add the objectsmap.h file button on the project tab to open the HTMLHelp API information window. On the Map tab, add the objectsmap.h file |
| On the Alias tab, click the Include button, and add the objectsalias.h file. Click OK, and you will see that the files have been added to the overall project file. |

| 7. | Press the Save button  to save your changes to the project file. to save your changes to the project file. |
| 8. | Press the  button to compile your new CHM file. button to compile your new CHM file. |
|
