|
Upgrade the application to USoft 9.1. Use the automated upgrade procedure.
The upgrade routine will upgrade:
•USoft Authorizer. •USoft BenchMark. •USoft Definer. •USoft Service Definer •USoft Windows Designer. •USoft Web Designer. |
| 1. | Start USoft Binder for USoft 9.1. |
| 2. | Choose Item, New from the menu. Check the Upgrade checkbox. Press the Add button. |
| The Upgrade Tool item appears in the item list. |
| Save work by pressing the Save button. |
| 3. | Double-click on the Upgrade Tool item. |
| The Upgrade application is opened. |
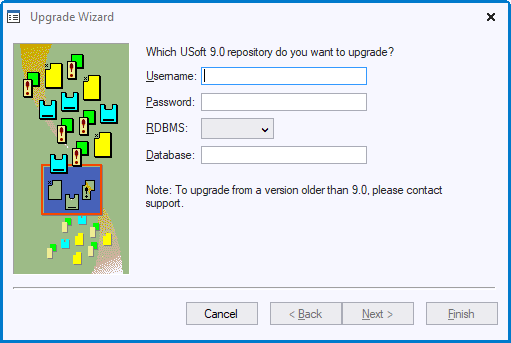
| 4. | Choose File, Start Upgrade from the menu. The Upgrade Wizard is displayed: |

| 5. | Type the user name and password you use when connecting to the database. |
| 6. | From the dropdown list, choose the RDBMS you are connecting to. |
| 7. | In the Database field, specify the connect string you use to identify the database to which you are connecting. For Oracle over SQL*Net V2, for example, this would be of the form: |
<machine_name><database_sid>
| See your RDBMS documentation for more information. |
| 8. | Press Next to continue. The second dialog is then displayed. |
| 9. | Click Finish to start the automated upgrade procedure. Allow time for it to complete. |
| 10. | When there are no errors, a message will be displayed saying "The upgrade procedure completed successfully.".
If the upgrade fails for any reason, the reasons for failure will be written to a file name UPGRADE.LOG in the USoft Log directory. After checking the log file and fixing the reasons for the failure, the upgrade procedure can be started again. The upgrade procedure will automatically continue where it was left off. |
|
Next Step
Step 6: Violation reports of target repository
|
