|
In this step, you will run that batch job that you just defined, and then have a look at the result.
To run the job:
| 1. | Create a new folder in the "<installation>\Testdrive\Htmlgenerator" folder, named Step6. |
| This is the directory that your HTML report will be created in. |
| 2. | Click on the Batch Runner item in the Binder, then click the right mouse button. |
| 3. | Change the value of the Directory field to "<installation>\Testdrive\Htmlgenerator\Step6". |
| 4. | Clear the Read Batch Definitions From File check box. |
| This time you want USoft to read batch definitions from the repository (database). |
| 5. | Click on the job in the Jobs field, click Delete, and then click Add. |
| 6. | Type "STEP6_JOB" in the Job Name field on the Edit Job And Parameter dialog. |
| 7. | Click OK on both dialogs. |
| 8. | Double-click the Batch Runner item to generate the HTML report. |
To view the result:
| 1. | Choose File, Open File from the menu of your web browser. |
| 2. | Locate the ScheduledTourStep6.htm file in the "<installation>\Testdrive\Htmlgenerator\Step6" folder, and then open the file. |
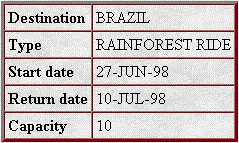
| The result for each recordshould be as in the illustration below. |
| 3. | Note the simple structure of the report: just one file that displays the data in one form. |
To get this HTML report in a different format:
| 1. | Go back to the HTML Set subtype window. You can call this window from the External Sets definition window in the Definer. |
| 2. | Set a different Layout Style. |
| 3. | Save these new settings. |
| 4. | Run the batch job again. |
Next Step:
Step 8: Exploring the Generated HTML
|


